
Introduction #
Are you looking for a simple solution to get notified about failing cron jobs? Or do you want to receive other program outputs from your server? Then the SMTP client msmtp can help you.
Prerequisites #
To follow this guide, you’ll need the following:
- A Linux-based operating system (we’re using Debian)
- An SMTP server (either self-hosted or through your email hosting provider)
What is an SMTP Client? #
An SMTP client is an application used for sending emails. As the name suggests, it uses the Simple Mail Transfer Protocol
(SMTP for short). This client can be used to send messages from the server to a mailbox. The type of message doesn’t matter. Such a client is often used to receive output from failing cron jobs. You can also, for example, record failed login attempts with fail2ban and get notified via email.
As you can see, there are multiple use cases where it makes sense to have emails sent from your server. To avoid having all programs communicate individually with the SMTP server, it’s useful to have a local client configured. This saves you configuration effort, and when switching email providers or SMTP credentials, you only need to change the settings in one place.
Configuring msmtp #
In this How-To , we want to set up msmtp as such an SMTP client. This application excels through its lightweight nature and simple setup.
To get started with the setup, we first need to install the following packages:
Debian #
apt-get install msmtp msmtp-mta mailutils
Alpine Linux #
apk add msmtp mailutils
Fedora #
dnf install msmtp mailutils
Configuring msmtp #
To set up msmtp, open and edit the file /etc/msmtprc with an editor of your choice.
We’ll cover the relevant adjustments in individual steps:
# Use the mail submission port 587 instead of the SMTP port 25.
port 465

# Always use TLS.
tls on
tls_starttls off
Here you specify the SMTP port of your provider. Common ports are 465 and 587. Port 25 should no longer be used if possible. You also need to specify whether TLS and/or STARTTLS should be enabled. You can find explanations for both options under TLS
and STARTTLS
# Mail account
account <ACCOUNT_NAME> # e.g.: STHEOS

# Host name of the SMTP server
host <SMTP_HOST_NAME> # e.g.: smtp.mailprovider.com
In this section, you define the name of the account you want to set up. You can freely define this name.
The host option requires the hostname of your SMTP server. You can find this in the email client setup guides from your email provider.
# This is especially important for mail providers like
# Ionos, 1&1, GMX and web.de
set_from_header on

# Envelope-from address
from <SENDER_EMAIL> # e.g.: sender@example.com
The set_from_header setting causes the FROM header to be set by msmtp. Some providers require this to accept emails. If you’re unsure whether this option is needed, try both. You must define from in any case. This is the email address used as the sender.
With your own domain and appropriate email settings, you can enter something like hostname@mydomain.com here to identify which host sent the email.
# Authentication. The password is given using one of five methods, see below.
auth on
user <EMAIL_USERNAME> # e.g.: mailaccount@example.com

# Password method 1: Add the password to the system keyring, and let msmtp get
# it automatically. To set the keyring password using Gnome's libsecret:
# $ secret-tool store --label=msmtp \
#   host smtp.freemail.example \
#   service smtp \
#   user joe.smith

# Password method 2: Store the password in an encrypted file, and tell msmtp
# which command to use to decrypt it. This is usually used with GnuPG, as in
# this example. Usually gpg-agent will ask once for the decryption password.
#passwordeval gpg2 --no-tty -q -d ~/.msmtp-password.gpg

# Password method 3: Store the password directly in this file. Usually it is not
# a good idea to store passwords in plain text files. If you do it anyway, at
# least make sure that this file can only be read by yourself.
password <EMAIL_PASSWORD>
Here you specify whether authentication with the SMTP server is required, and if so, define it. For simplicity, we’re using option 3 in this case and writing the credentials directly into the configuration file.
This option is not recommended for production use. It’s better to use one of the other two methods here.
# Set a default account
account default: <DEFAULT_MAIL_ACCOUNT> # e.g.: STHEOS

# Map local users to mail addresses (for crontab)
aliases /etc/aliases
In the last part of the script, we define a default account for sending emails and set the path for the alias file. We’ll define this in the next chapter.
This completes the configuration of msmtp itself, and the configuration file will look something like this:
/etc/msmtprc
# Set default values for all following accounts.
defaults

# Use the mail submission port 587 instead of the SMTP port 25.
port 465

# Always use TLS.
tls on
tls_starttls off

# Set a list of trusted CAs for TLS. The default is to use system settings, but
# you can select your own file.
# tls_trust_file /etc/ssl/certs/ca-certificates.crt

# Mail account
account <ACCOUNT_NAME> # e.g.: STHEOS

# Host name of the SMTP server
host <SMTP_HOST_NAME> # e.g.: smtp.mailprovider.com

# This is especially important for mail providers like
# Ionos, 1&1, GMX and web.de
set_from_header on

# Envelope-from address
from <SENDER_EMAIL> # e.g.: sender@example.com

# Authentication. The password is given using one of five methods, see below.
auth on
user <EMAIL_USERNAME> # e.g.: mailaccount@example.com

# Password method 1: Add the password to the system keyring, and let msmtp get
# it automatically. To set the keyring password using Gnome's libsecret:
# $ secret-tool store --label=msmtp \
#   host smtp.freemail.example \
#   service smtp \
#   user joe.smith

# Password method 2: Store the password in an encrypted file, and tell msmtp
# which command to use to decrypt it. This is usually used with GnuPG, as in
# this example. Usually gpg-agent will ask once for the decryption password.
#passwordeval gpg2 --no-tty -q -d ~/.msmtp-password.gpg

# Password method 3: Store the password directly in this file. Usually it is not
# a good idea to store passwords in plain text files. If you do it anyway, at
# least make sure that this file can only be read by yourself.
password <EMAIL_PASSWORD>

# Set a default account
account default: <DEFAULT_MAIL_ACCOUNT> # e.g.: STHEOS

# Map local users to mail addresses (for crontab)
aliases /etc/aliases
Defining Aliases #
With the alias file, we define which aliases are used for which recipients. As you can see from the mailer-daemon example, multiple aliases are possible. In our case, all standard aliases are directed to root, and root has our email defined as the recipient.
/etc/aliases
mailer-daemon: postmaster
postmaster: root
nobody: root
hostmaster: root
usenet: root
news: root
webmaster: root
www: root
ftp: root
abuse: root
noc: root
security: root
root: <RECIPIENT_EMAIL> # e.g.: recipient@example.com
Setting up Sendmail #
To send emails through msmtp by default, we need to edit the mentioned file.
This way, when /usr/bin/mail is called, msmtp is called in the background, but the choice of our SMTP client remains independent.
/etc/mail.rc
set sendmail="/usr/bin/msmtp -t"
Sending Cron Job Output #
If we want to have all output to stdout from cron job execution sent to us, we need to define the MAILTO parameter at the top of the crontab. To do this, edit the file using crontab -e. Your defined editor will open and you can make the settings. The result will look like this:
MAILTO=<RECIPIENT_EMAIL> # e.g.: root or recipient@example.com

1 2 * * * ...
3 4 * * * ...
Testing the Configuration #
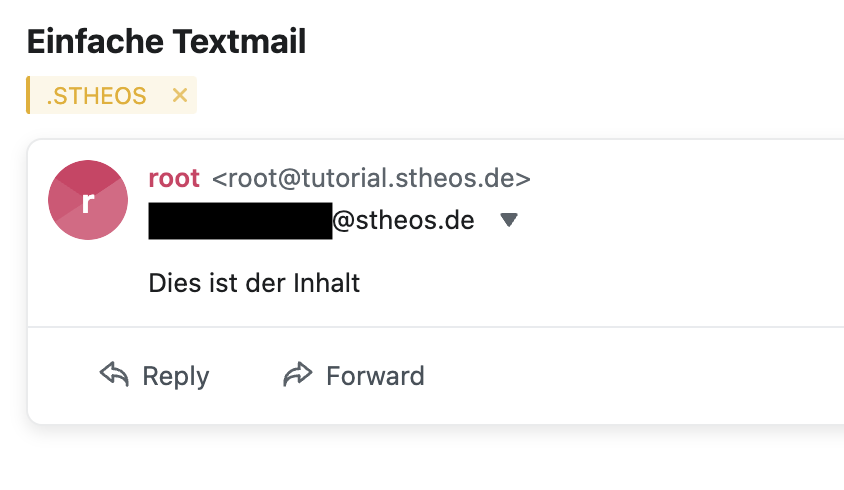
To check if the newly configured mail client works, let’s send a few test emails. Let’s start with a simple text email:
echo "This is the content" | /usr/bin/mail -s "Simple text email" root
The -s parameter defines the email subject and root is the recipient in this case.
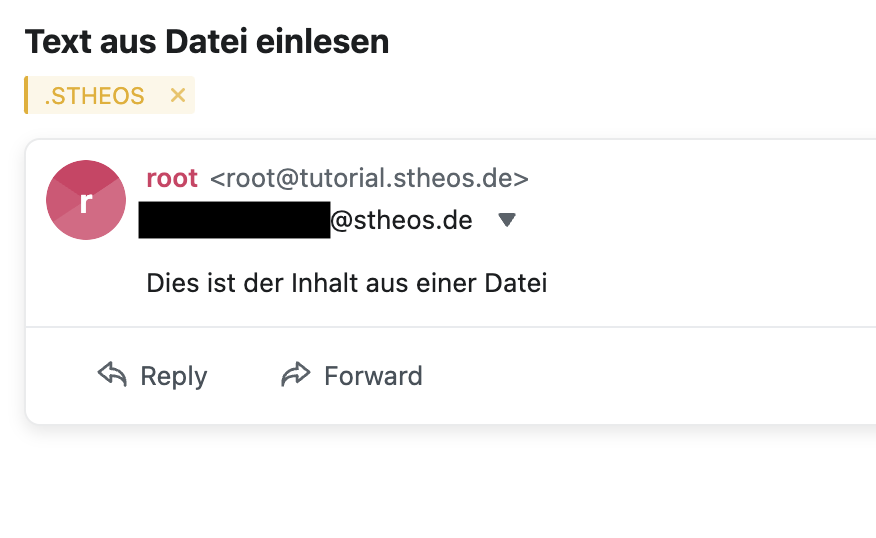
Alternatively, you can read content directly from files. This is useful, for example, when you want to send error logs.
/usr/bin/mail -s "Reading text from file" root < /tmp/error.log
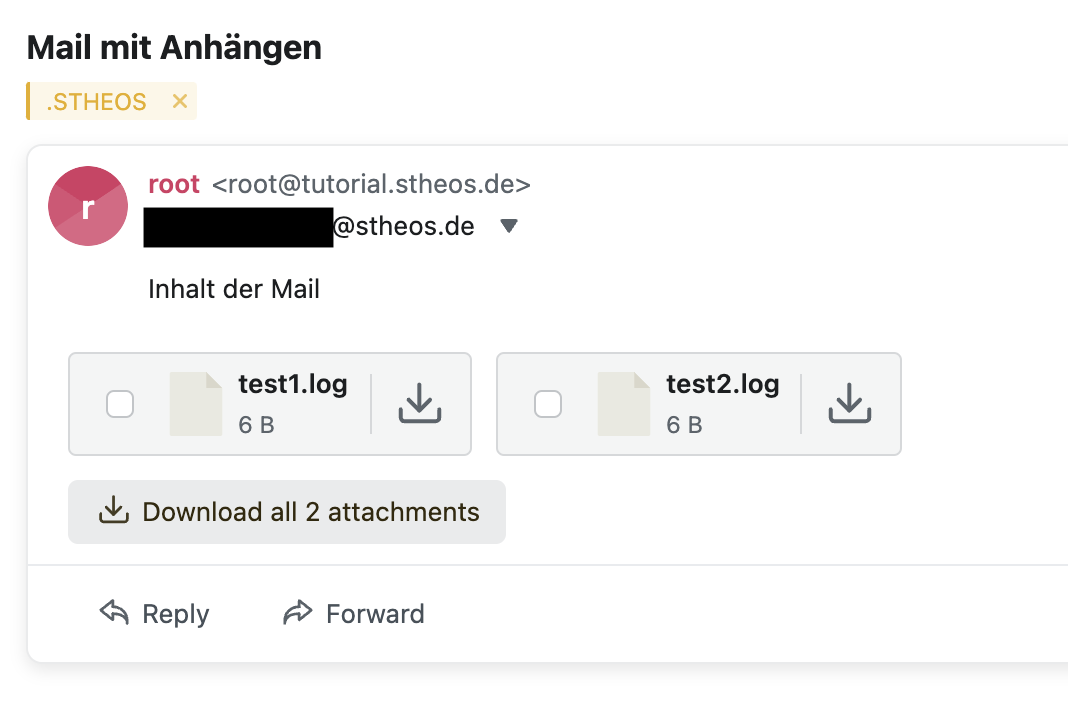
If the log file is too large or you want to send multiple log files, it’s recommended to put these files as attachments. You can do this as follows:
echo "Email content" | /usr/bin/mail -s "Email with attachments" -A /tmp/test1.log -A /tmp/test2.log root
With the -A parameter, you can define one file path each. This file will then be sent as an attachment.
Note the maximum email size accepted by your email provider.
If you have questions or suggestions, don’t hesitate to contact me through the channels listed below.